I have made quite a few maps since I became interested in the mysteries of the forbidden lands and even today I am still finding new details that may point to more revelations sequestered deep within the game.


Map with coloured legend
The above map was the first one I made back in the Playstation 2 'Quest for the Last Big Secret' forum days. I put it together after an extensive amount of time spent exploring the outer edges of the world map. At the time, we knew of the beta lands from Pikol's videos but could only see small parts of each area at a time. It wasn't until later that I realized that the entire J column was one continuous long chain of mountains.
The map went through many iterations until its final version (above) which shows the black 'crash' area, a dead zone that crashes the game if Wander enters there. It was one of WWWArea's insights that allowed us to finally explore this dead zone. The Yellow area is where the opening and final cut scenes take place, way off to the west of the world map. Again, it was Pikol who first noticed this, using the 'wireframe' feature of the PCSX2 emulator he could see the actual Shrine of Worship (the one we see in game) way off in the distance to the south east, so he knew the cut scenes were taking place in an area outside the game map. The other evidence for this many players had already noticed... the beams of light above each defeated colossus arena can be seen in the final cut scene way off to the south east. For instance, when you see the corpse of Malus in the end cut scene you can see beams of light 'behind' it. How could there be other dead colossi here?
We knew about the H8 invisible lands from Syd-tiger's discovery of it in 2008, but I independently discovered the D8 invisible lands and posted it on the Playstation forums. However, it seems Pikol had already discovered them but mistakenly claimed there was solid land at J8 (an oversight on his part). But I noticed there was a symmetry between the two quadrants that had 'solid ground' (H8 and D8), which I thought was very interesting! It seemed significant that there were two solid quadrants equidistant from the center column.
I next explored the blue quadrants that exist on the southwest and southeast corners of the map. These mysterious squares are still unexplained today. Interestingly, the J8 blue square has 16 triangles on its east side (probably a coincidence?)
Final game map with colossi clouds and icons removed

NTSC/PAL final map with unused lands shown
The map is made up of 100 squares if you count the A column and 9th (bottom) line of squares that are outside of the map proper. These squares only contain the mysterious blue squares and some left over lands in the A column that are unreachable in the game. So out of the 100 map squares, 24 are occupied by lands that are out of bounds, quite a large chunk of real estate that was left unfinished.
On the final version map there are clouds around the lands that are 'fixed', that is they do not disappear when a colossi is defeated but stay fixed in place throughout the game, so there was never any way to see below these clouds. It was known that the world map from the demo games was different to the final release map, but again these areas were still hidden by clouds. It wasn't until Pikol extracted the map from the demo using a texture editor that we first saw what the whole map looked liked without any clouds.

On the final version map there are clouds around the lands that are 'fixed', that is they do not disappear when a colossi is defeated but stay fixed in place throughout the game, so there was never any way to see below these clouds. It was known that the world map from the demo games was different to the final release map, but again these areas were still hidden by clouds. It wasn't until Pikol extracted the map from the demo using a texture editor that we first saw what the whole map looked liked without any clouds.

Final map at start of a new game

Final map showing fixed clouds

Final map showing colossi arena clouds

Preview version map with coloured legend
You can see the extra lands that are present in this earlier version as well as another black screen crash area although this time to the south right over the I7 quadrant. It also covers most of the I6 quadrant which made mapping it very difficult. But apart from I6 the lands in this area are identical to the final release version. However, the H8 invisible lands are coloured blue whereas in the final version they look just like the surrounding ocean.


Pre-release (Preview) version map free of clouds
In the earlier demos and the Preview version of the game, the world map is very different from the later final release world map. Here the colossi icons are black, the entrance temple, main bridge and G2 forest are missing, several of the colossi arenas are different, but most importantly, there are no fixed map clouds allowing us to see the previously hidden lands for the first time.

Preview map with unused lands shown
The Preview version also had some extra unused (beta) lands sprinkled around the map, including some beach like cliffs at B2 and G0, a strange flat brown texture at B1, a vast area of land to the northwest and an extra quadrant at I6. It also features a lot more of the mysterious blue lands, in fact they fill the entire bottom line of the map. In this version the 'invisible lands' at H8 are also coloured blue and retain their solid, walkable floor, but D8 is not coloured blue, even though it also has a solid floor. The three blue triangles we see in the final map at C9, I7 and I8 are missing.

Mapping the blue lands

Mysterious vast blue lands

Beach like cliffs at G0

Similar beach like cliffs at B2

Flat, brown land at B1

Close up of top left corner beta lands from the Preview version

Corrupt I6 quadrant
The I6 quadrant is very interesting as it only appears in the Preview version and gives us a glimpse at what some of the earlier landscapes looked like before they were removed. Even after the Preview version appeared it remained unexplored due to the black screen crash error, normally we can lock a quadrant of land then explore it in these cases, but this one was particularly corrupt and the game would still freeze on occasion. But I eventually managed to explore it and found that it's a continuation of the sheer cliffs we see at J6 (its neighbour map square to the east). Check out the video here:

Beta Dam and mountains from above

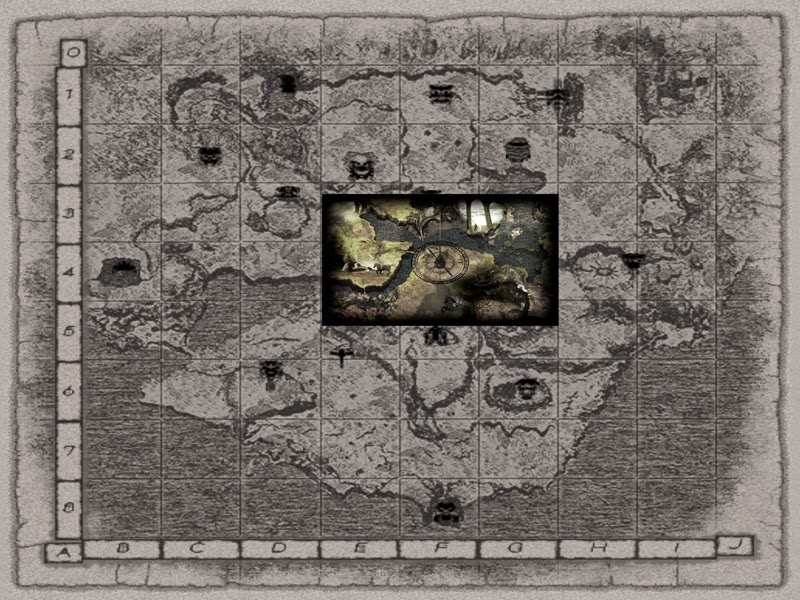
Map showing co-ordinates
The above map highlights the map squares as a grid and shows the co-ordinate values of each square with positive values to the west and south, negative values to the north and east. The centre of the map is in the lower left corner of F4 which is a patch of grass near the entrance to the Autumn forest at E5, so nothing significant. You can use a Codebreaker code to change the sword light value to zero (normally it starts at 1) and it will point to this spot. You can see my video of this anomaly here:

Preview version shows map co-ordinates in game

3D map quadrant
Each map square is 600m wide x 600m long but what most people don't know is they are also 600m in height. The death floor is 300m below ground level and the highest point the beta mountains reach is 300m above ground level. In fact most of the beta mountains found in the J column float around this elevation. There are a couple of places around the forbidden lands where you can fall through the ground, or sometimes you can be glitched down by a colossus and end up at the death floor. The same death vectors can be found at the bottom of canyons and around the coastline. So we can now imagine each map square as a three dimensional cube with the forbidden lands in the centre and the death floor below.
World Map Quadrant Names
Below is a map I made with each quadrant assigned a name. Most are based on the names given for the save shrines that occupy that quadrant, but others fans have named and some I have made up myself. I have yet to name the lands beyond the map but will get to this sooner or later ; ) The developers have no names for the map squares, just a grid reference, like a chess board, although reversed with the numbers on the left side and the letters at the bottom.

See hi-res version here:

In fact, just for a laugh I re-positioned the map to correspond to a chess board, which means flipping the game map upside down (see above).
Codebreaker Defeated Icons
Another Codebreaker code lets you change the number of colossi you have defeated. Normally this stops at 16, but if you change it to 17 or above you will see some strange icons appear at the centre of the map when you load a saved game. Could these be the discarded colossi icons? They don't appear to have any details and look more like glitched icons, but it's interesting that they appear there at all. I have checked all the icons that appear from 17 to 24 but there is nothing special about them, they just seem to be glitched versions of the regular 16 colossi icons we see in the game.

Map showing 24 colossi defeated

Closeup of the 24th colossi icon

Colossi Icons
Speaking of the colossi icons, I recently laid them all out so I could get a better look at them and see if they matched up with any of the blocks and symbols we see around the lands. It's also interesting to see how they compare to each other between the different versions. The earlier demo/pre-release versions have simple greyscale icons which look crude in comparison the to final release icons, which are coloured and more detailed. I also added the colossi death screens, that is the colossi face you see when Wander dies fighting a colossi, and the temple statues to the chart.

Top line are the demo/pre-release icons, 2nd line the final version icons

3rd line are the colossi death screens, 4th line are the temple statues

https://www.flickr.com/photos/nomadcolossus/23830701293/in/photostream
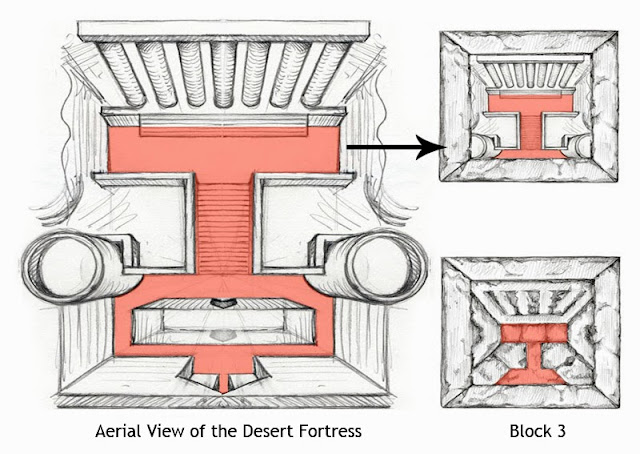
The early icons are hard to make out, some looking like an amorphous black blob, while others have more detail to them. The colossi death screens seem to match the final release icons quite well though. So I did my best to match the 4 main block symbols we see around the lands, that is in the Shrine of Worship, on the main stone bridge, the entrance temple and at #13's ruined temple. I also added the 4 strange blocks we see at #16's area which also resemble colossi faces.

Chart symbol blocks representing colossi faces
This was the best match I could find using the block symbols, if indeed they are supposed to represent colossi faces at all. The 4 Malus area blocks do look more like faces than the Shrine of Worship blocks in my opinion. But the block I have matched to Phaedra (#4) is clearly not a colossi face as it matches the design on Wanders poncho, the symbol of his village perhaps?
Intersecting Points Theory
Intersecting Points Theory
This brings us to the now infamous 'Intersecting Points' idea thought up by Ascadia-PSU around June 2007. However, another user on the Playstation forums 'Barba_Negra~' actually posted the idea first, or at least a variation of it, but Ascadia seems to have already been thinking about a similar concept to do with the sword light pointing to a secret. Also SageApple (aka: RasinGirl) had a lot of influence in the early days of the theory and also postulated that the four main temple blocks represented specific colossi arenas. Barba_Negra's idea was to match the 4 main temple blocks to specific parts of the map and then, by shining the sword at the right place, a door would open on the Shrine of Worship, specifically the large blue/purple door (wall) on the south west side. But his idea involved climbing certain save shrines to shine the sword from.

Ascadia believed the enigmatic words of Emon's introduction 'That place... began from the resonance of intersecting points' was a clue given by the developers to the players that a hidden secret was to be found in the game. 'They are memories replaced by ens and naught and etched into stone' referring to the 4 symbol blocks we see at the Shrine of Worship and in other places around the forbidden lands.


When Dormin introduces a new colossus it usually starts with a description of the location, a seaside cave, a giant canopy, the land of vast green hills, a misty lake etc. So Dormin is describing Celosia's area here, but why it mentions the altar is strange as it plays no role in the battle. You would think it would be something like 'Fires burn in an underground temple' or similar, instead it mentions this odd structure.
It should be noted that there are other areas that have no purpose, for example the deep pit at #4's area (Phaedra) where you first enter. Below you is a strange dead end area with ramps and paths that circle back on themselves, it serves no purpose in the colossus battle as Phaedra just turns and walks away. Another is the other side of the waterfall at #12's area (Pelagia), you can swim across to it but it's another dead end. In real life we don't look at a dead end area and wonder 'why is this here' but in this finite game world it seems to peak our interest.


 Zoomed in shot of the colossal tree (is low res only)


 Island at C7 - you can see how enormous this island is to compared Wander and Agro


 F3 map quadrant from the demos


In the latest edition of Edge magazine (issue #261), there is a new interview with Fumito Ueda by Daniel Robson. I was in contact with Daniel before the interview so I asked him to sneak in a few questions... Daniel allowed me to ask three questions which were:
1) Where were the arenas of the 8 discarded colossi located on the world map?
2) What was the purpose of the Dam like structure at I2 on the world map?
3) Was it once possible to climb to the very top of the Shrine of Worship?
But only one question ended up being answered in the article.
On the topic of Shadow of the Colossus, where on its map had you planned to place the eight colossi that were cut from the game?
The map in the game is designed to house 16 colossi. In other words, because the placement of those 16 colossi determined the shape of the map, it would be a completely different map if we'd included all 24. The intention was to choose the 16 best colossi and focus on making those ones even better. I think we were halfway through production when we decided to reduce their number. Oh, there's certainly leftover test data and half-edited areas, but it's a bit like the Minus World in Super Mario Bros: I think it holds more romantic appeal if you don't know the specifics.
So in other words, Ueda prefers not to say much about this topic and would rather leave it up to the players to decide what the world map once looked like 'it holds more romantic appeal if you don't know the specifics'. So we may never know where the 8 discarded colossi were originally planned to be, as those areas of the map don't exist in the game anymore, or if they do we can only speculate on where they are.
Daniel also asked Ueda about the Dam (off the record) that is it didn't appear in the article, he asked how he felt about fans being so passionate that they hack the game to find stuff like that, but he simply replied, 'That comes from an illegal source, so no comment'. In other words it's clear Ueda doesn't like the idea of players hacking into his beloved creation... this bodes badly for any future answers to these sort of questions.
Which really sucks! As we will never find out what the Dam's meaning was or where the beta colossi were placed or how they worked. Unless I can convince some other Team Ico member to answer questions we will never truly know these answers to these questions.

Ascadia's early ideas/sketches from June 2007
Ascadia believed the enigmatic words of Emon's introduction 'That place... began from the resonance of intersecting points' was a clue given by the developers to the players that a hidden secret was to be found in the game. 'They are memories replaced by ens and naught and etched into stone' referring to the 4 symbol blocks we see at the Shrine of Worship and in other places around the forbidden lands.

Map showing the intersecting points theory (from the Playstation forums)
The above map shows the four symbol blocks representing four specific areas on the map made by SageApple from the Playstation forums. They represent the entrance temple, #7's lake, #15's desert temple and the Shrine of Worship. The points intersect over #11's underground temple. But you may notice that two of the blocks have been rotated 90 degrees (see the chart further up for their original configuration). However, on the bridge the blocks appear in different patterns, all rotated in various ways as you travel along the bridge, so their configuration changes depending on where you are in the lands. You may also notice that #15 desert temple block is too far east in H1 when it should be in G1.

This is what the map should look like
The four blocks still intersect over #11's area so the idea is still valid although it doesn't look as convincing as SageApple's original map. The problem was always with the western block at #7's lake. People had noted that this block represents the symbol on Wander's poncho and even resembles the sigils found on the colossi. If this block represents Wander you would think the likely position for it would be the Shrine of Worship where Wander is sent back after each colossi battle.


Above we see SageApple's detailed drawings of each block and how they relate to specific areas on the map. The entrance temple block seems to make sense revealing a bird's eye view of the entrance temple, #15's desert temple is a little harder to match up with the block representing it but is still believable, the Shrine of Worship block is still harder to match I think as the bridge tapers out at the top and the design representing the Shrine of Worship looks unconvincing, some have suggested it represents a save shrine instead, but #7's block is completely off. SageApple tried to match it with the spiral tower in #7's lake but you can see there is no real similarity here. The explanation involved the tower being able to rotate somehow so the ledges would fit the block design. However, there are only two ledges and the block would need four for this idea to work and of course the tower doesn't rotate.
In fact, SageApple's original idea was that this symbol represented #13's temple as seen from above, which makes more sense to me as its a circular structure and is the only temple in the forbidden lands which features the temple blocks (Note: Upon further examination, #13's temple only exhibits three of the four blocks). It's also far removed from the other structures that feature the temple block designs, the Shrine of Worship, main stone bridge and entrance temple are all joined together and are covered with the four block designs. The desert temple at #13's area is dislocated from these three structures and sits alone way off to the south west. It's a small ruined temple that looks to be thousands of years old - much older than the Shrine of Worship, bridge and entrance temple, although this could be a result of erosion caused by being sand blasted by the desert sands over time. Still, I find it odd that this one lonely structure of all the ruins in the forbidden lands has some of these mysterious designs carved into it. Surely this is a clue?

In fact, SageApple's original idea was that this symbol represented #13's temple as seen from above, which makes more sense to me as its a circular structure and is the only temple in the forbidden lands which features the temple blocks (Note: Upon further examination, #13's temple only exhibits three of the four blocks). It's also far removed from the other structures that feature the temple block designs, the Shrine of Worship, main stone bridge and entrance temple are all joined together and are covered with the four block designs. The desert temple at #13's area is dislocated from these three structures and sits alone way off to the south west. It's a small ruined temple that looks to be thousands of years old - much older than the Shrine of Worship, bridge and entrance temple, although this could be a result of erosion caused by being sand blasted by the desert sands over time. Still, I find it odd that this one lonely structure of all the ruins in the forbidden lands has some of these mysterious designs carved into it. Surely this is a clue?

Pool room map points to #7's lair
If the idea of the western block representing Hydrus' lake was in doubt SageApple provided some further evidence that seemed to support the idea. The above map shows the sequence the 4 main blocks follow in the pool room at the back of the main temple. The blocks seem to follow no consistent pattern with each alignment being made up of different variations of the blocks, but in one spot (highlighted by the blue arrow) three blocks line up (the western block with Wander's symbol). This was interesting in itself but perhaps just a coincidence until SageApple overlaid it on the world map. The three blocks appeared to point straight to #7's lair! This was some impressive deduction by SageApple, but I find it hard to believe that Team Ico would expect players to go to these lengths in order to discover a secret. I'm sure other variations of blocks or ruins would point to landmarks if you overlaid them on the world map then used Photoshop to reduce or enlarge the diagrams to fit a preconceived idea. Still, it provided some validation to the intersecting points theory (at least for a while).

The sealed door at the intersection of the four points

Opposite door is smashed open
If you read the earliest posts by Ascadia you will see there were different ideas as to which areas the 4 blocks represented, but over time the idea evolved into the four areas described above. They intersect above #11's underground temple where a mysterious bricked up door can be seen at the back of the temple. Directly above the sealed door is one of those large circular medallion symbols which SageApple noted are only ever found above open passageways. This is true to a point, at #8's anti-chamber temple there are two similar medallion symbols that both appear above open passageways. At #6's underground temple you see a smaller medallion symbol as you enter the passage that leads to the colossi's lair, but the others (at #3, #6 and #16's areas are found at ground level).

Medallion symbol above sealed doorway (adjusted)
The door you enter #11's underground temple from has been smashed open in the past, possibly by Celosia? It's clear it used to be sealed, so the idea was if this door can be broken open perhaps the opposite 'sealed up' door could also be smashed open as well? The obvious way to make this happen was to get Celosia to ram it. Many players tried and failed to make this happen. The other mysterious aspect of this level is that it is the only area where you are given an object to use (the wooden stick). It is possible to lure Celosia to the back of the temple and have it ram the door, with Wander rolling out the way at the last second but the wall remains intact, players even tried using the torch to try and open the door, holding it up in the hopes of triggering a new cut scene but to no avail.

The sealed up door is opened! (Photoshop montage)
I made this image to get a sense of what we all hoped to find. In my mind once the door opened you would see a large room lit by a couple of torches. It had been suggested that this was where Dormin was first imprisoned once the population of the forbidden land rose up and overthrew it. There would be a set of stairs leading down to an underground passage that would lead south to the Shrine of Worship. But it was Radical Dreamer who finally put an end to the speculation (for the most part). With his amazing hacking abilities he made a short video of Wander warping through the sealed door revealing there was nothing behind it. See it here: https://youtu.be/CTpqmoq5e9Q?t=139
But players were still not satisfied! Perhaps a new model was loaded when the right conditions were met? That is, if you did something in the game in the correct order such as shining the sword from a specific location the sealed door would open. You would see a short cut scene of this and a new area would be loaded behind the sealed door? But in the end nothing ever happened (sadly).

Medallion symbols map

Map based on the 4 symbol blocks representing colossi faces (see chart above)

Map based on the 4 Malus blocks representing colossi faces (see chart above)
You can see there is no cosmic significance here... if the blocks represent colossi then there appears to be no correlation to any secret hidden on the map, same goes with the medallion symbols. It seems they are just decorative in nature and nothing more.

Normal and hard mode distribution map
This was another idea I had in the hopes of finding a secret. Only six colossi have an extra sigil when playing in hard mode, but again there appears to be no significance here. The hard mode squares don't intersect in any way and why there are only six out of the sixteen with extra sigils is anyone's guess.
Web Map
In the first official Shadow of the Colossus website (October 2005) a map is shown obscured in darkness with a circle of light you could move around to see glimpses of the world. In the centre was a compass, and surrounding this were links to different languages. Once you clicked on your native language it would take you to the website proper (which sadly no longer exists). However, I did take some snapshots of the other parts of the website before it was deleted (see below).
Website map - only a small area is highlighted
Website map with darkness removed
I tried different methods to reveal this map with long hours wasted in the attempt ; ) My first method was to record a video then export the video as individual frames, I then opened these in Photoshop and cut out the circle of light from each frame. But when I tried to put them all together it just wasn't clear enough. There is a 'smoke' effect in the circle of light that further obscured things. In the end I used a Flash editor to extract the map so I could examine it in more detail.
Web map overlaid on world map
You can see how small the web map is compared to the total world map, basically it's about the size of the demo map (9 squares) but this map was different to anything I'd seen before. It has some different (earlier) features that the demos and retail version maps lacked. The highlight was a previously unseen image of the original trail leading to #4's lair which can be seen on the Demo/Preview maps but never in any game versions.
Closeup of the trail to #4's lair (Phaedra)
It fits over the world map perfectly!
Comparisons of G4/G5 between versions
You can see above how the map was changed to accommodate the shift in Phaedra's lair. The left side shows the final version, the right the previous version found only in the Demo and Pre-release version. It's not clear why they had to change this part of the map, but when you view the actual map square found in the code you can see it's a quick fix.
Cut and paste job at G5 - seems like a quick fix
Extra boulders shown at F3 beach
Another difference I noticed were what look like large dark boulders or rocks shown of the west side of the beach at F3 (Quadratus' lair). I doubt these rocks had any significance in the fight with Quadratus, although it does look like you could hide behind them if the need arose. There also appears to be some smaller rocks strewn around the beach as well. You'll also notice that the earlier design of Quadratus (the scary version) is superimposed on the map, so we can conclude that when this design of the colossus was in play, the beach was slightly different in an earlier build.
Compass arrow points to the 3rd Colossus
When I overlay the web map onto the world map the compass arrow points directly to the third colossus. The web map fits perfectly over the world map and the compass arrow is positioned at around 45 degrees. Is this a clue left by the designers or just another coincidence? Remember, there was a demo released that let you fight the first three colossus, perhaps in this unseen demo there was an easter egg at #3's lair, as we know from the final versions that there are no secrets found here.
Part 1 - The bridge
Part 2 - First colossus ledges
Part 3 - Ramp and canopy
As mentioned above, once you had clicked on the language link you were taken to different screens of the website. I'm not completely sure how this worked as it was a long time ago, but I remember you could move your mouse pointer around to find hidden 'mouse over' points that would direct you to information, wallpapers and videos etc. But above we see how different #3's area was back then. The ramp supports are on a strange angle, as if the ramp has been rotated. In the game the supports are vertical.
Closeup of the ramp - the compass points to this area
See web map video here: https://youtu.be/XoarR8DKX_8?t=392
Early official website (in part):
http://web.archive.org/web/20051026015914/http://www.shadowofthecolossus.com/
http://web.archive.org/web/20051026015914/http://www.shadowofthecolossus.com/
Logo Map Secret
Another idea to emerge in regards to a secret on the map has to do with the Shadow of the Colossus logo that is seen on the game disc. It shows an outline of Valus (#1) with an 'X' scratched onto the logo itself. Some fans were sure this was a clue, a treasure map with X marking the spot of the secret. Interestingly, it seemed to pin point #11's lair just like the intersecting points theory.

Northern part of the map resembles the shape of Valus (Colossus #1)

Map with logo overlaid - notice the 'X'

Clearer image of the logo and map overlay

X marks the spot!

The problem with this idea is that the shape of Valus on the map doesn't really match the shape of Valus on the logo (see above). The map version has its arms outstretched while the logo version has its arms by its side. Also, the X is just a touch too far north, just past Celosia's lair, although you can make it fit with a bit of adjusting. Still there is enough similarity here to make you wonder... If it was a clue it led to nothing as there is no secret at #11's lair (as far as we know ; )
Hydrus Symbol Map
Another map that seems to point to #11's lair is a symbol found at Hydrus' lake (#7). On the stone wall where you enter the arena are strange map like symbols stamped into the columns. They are on both sides of the wall along with other symbols that show simple diagonal lines.

Map like symbol on wall at Hydrus' lake

It is a little hard to make out but I traced it in Adobe Illustrator, then posted it on the Playstation forums (along with a lot of other symbols I had been examining). Ascadia noticed a similarity to Celosia's lair as seen from above. According to Ascadia the map shows the winding path you take down the cliff face to reach the pool of water, the other smaller pool of water is also shown as is the strange altar found in the valley which seems to have no purpose. It's a bit of a stretch to believe this is a representation of Celosia's lair but again there is just enough detail here to make you wonder.

Celosia's lair as seen from above
Pools of water and winding path

Mysterious altar - does it have a purpose?
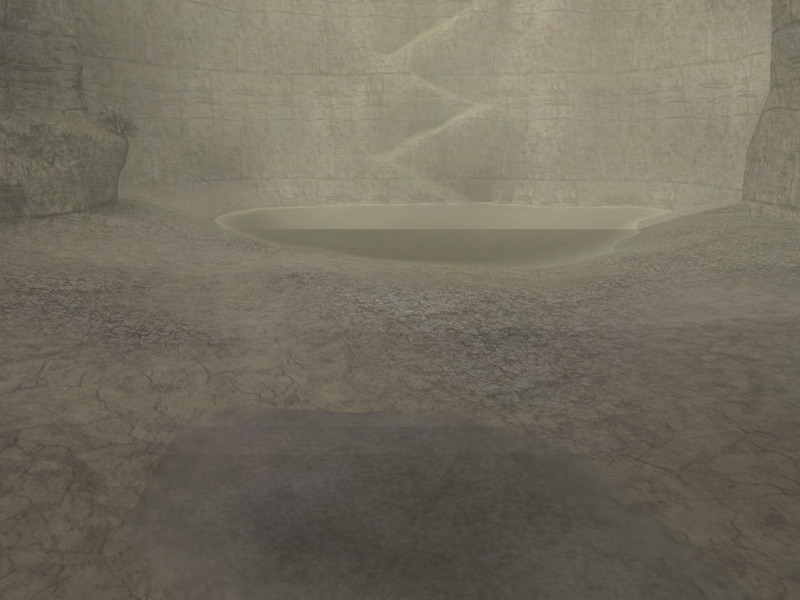
In Dormin's introduction for Celosia it says 'An altar overlooks the lake... A guardian set loose... It keeps the flames alive'. So it makes a point to mention the altar even though the battle takes place in the temple above (unless of course it means a different altar?) In an earlier build of the game there was a lake filling the entire valley floor, the pools of water are all that's left of this idea. Celosia was once planned to swim around in the lake but, according the Ueda, 'when we tried to make his swimming speed match Wander's, he looked weak, so we gave up on the idea'. So that explains the 'lake' description in Dormin's introduction but we still have no clue about the how the altar fits into the story. Perhaps because there is no mystery here, it's just something the developers added as a cool feature to spark the players imagination.

Canyon with lake filling the entire valley floor
When Dormin introduces a new colossus it usually starts with a description of the location, a seaside cave, a giant canopy, the land of vast green hills, a misty lake etc. So Dormin is describing Celosia's area here, but why it mentions the altar is strange as it plays no role in the battle. You would think it would be something like 'Fires burn in an underground temple' or similar, instead it mentions this odd structure.
It should be noted that there are other areas that have no purpose, for example the deep pit at #4's area (Phaedra) where you first enter. Below you is a strange dead end area with ramps and paths that circle back on themselves, it serves no purpose in the colossus battle as Phaedra just turns and walks away. Another is the other side of the waterfall at #12's area (Pelagia), you can swim across to it but it's another dead end. In real life we don't look at a dead end area and wonder 'why is this here' but in this finite game world it seems to peak our interest.
Opening Cut Scene Map
Here I froze the opening cut scene (in the OPM demo) then made Wander float above each map square to take a snapshot, I put the pieces together in Photoshop and overlaid them on the world map. You can see part of the eastern side is missing where Avion's lair should be, most likely it was not needed for the cut scene. But there are some interesting differences to this map that don't appear in the actual game.

Intro cut scene model map

Closeup of western section of map - colossal tree is verdant


Single path entrance to #3's platform

These rocks are missing in game

Closeup of giant boulders from opening cut scene model
World Maps
Below are some maps I compiled using individual quadrant squares exported using the Dormin model viewer (created by Youmoosotc). They are labelled as 'amb_xx.nto' for the hi res map squares and 'slow_xx.nto' for the low res map squares (xx denotes the grid reference). I took snapshots of each one individually then put them together in Photoshop.

Final version 'amb.nto' texture files arranged over the world map
Notice how D8 and H8 are included here, this tells us that they were important and somehow significant to the makeup of the forbidden lands. All the other maps squares join together to make up the peninsula except for these two. These both have solid floors but are otherwise empty and only H8 can be accessed in the NTSC version via Agro launching, D8 is off limits except via hacking the game. D8 also shows a previously unseen island that doesn't exist in the game (see further down for a closeup).

An alternate set of map squares also exist in the program code
Above we see another map that can be exported with the Dormin model viewer. This one is of a lower resolution than the first map and appears to be an earlier version. If you look closely at B4, H6, G5 and F0 you will see they differ from the first map. B4 (#10, lair) is just a flat brown texture, H6 is empty, G5 (#4's lair) matches the beta map unlike the later (final game) version and F0 has more land further north.

Final version 'slow.nto' texture files arranged over the world map
Then there is this version (above) with brighter colours, more like a cartoon style version. I had never seen this map before but it appears to be a low res version of the world map, possibly made as a reference for the later more realistic type maps? This one is interesting as it features some extra details missing in the other maps such as a green strip of grass at F0, much like what we see in the opening cut scene behind the Entrance temple. There are also a couple of map squares in the A column which reveals more land to the west, and a single leftover square at J7 which wasn't removed from the code.

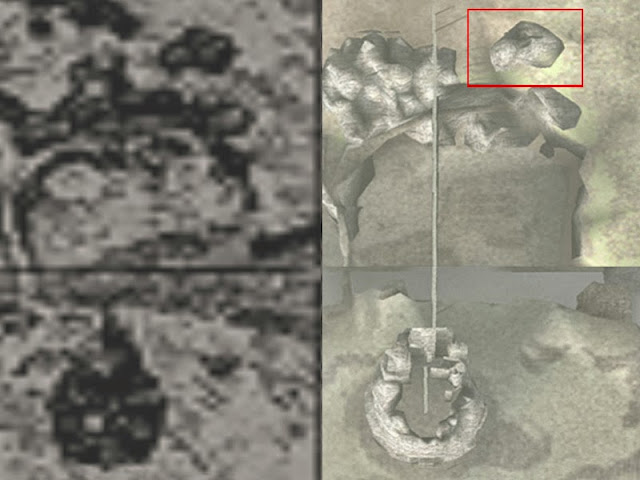
Final version 'amb_D8.nto' map square showing a previously unseen island
Above we can see the D8 map square in more detail. You will notice an island here which is missing from the game. I had no idea that this island still existed until today (10th September 2013), thanks to WWWArea who went looking for it. The collisions are still there, that is you can climb up this invisible mountain even though you can't see it! You may also notice a thin sliver of land at its northern edge, this also still has collision detection which tells me that the coastline once extended further south than it does today. You can also see what appear to be shadows cast onto the water below from these invisible ghost like cliffs.

Wander standing on the invisible island at D8

Using Blender I managed to reveal the island in all its low poly glory!
I think this island may have been very similar to the island found off the coast at C7 in the preview version. Perhaps both islands were too similar so they deleted the textures of the D8 island and left the C7 island intact? (See below).


C7 island in the Preview version - viewed from D7

A4 and A5 map squares reveal more land out west
In the pre-release (Preview) version there is some extra land out west behind the cliffs at the south side of Dirge's lair, near the Lair on the Mesa save shrine. The above map squares show a clearer view of what was once a much larger area of land that was removed from the game. There appears to be a trail heading west that you could follow up into the foothills and from there - who knows where it led?

B3 early colossus arena?
Here's something interesting! The above image was found only in the OPM demo program code (the earliest version we have) and seems to show an enclosed arena surrounded by cliff walls with a clear entrance to the south. Again, this is a new revelation to me only found recently. If it was an early colossus arena I have no idea which colossus it housed. Update: 28th April 2015, this quadrant appears to be the lair of the Roc!

B3 colossus arena as it looks today in the Preview version

B3 arena joins up with the smooth textured beta lands at A3

C7 island map square
This island still exists in the pre-release (Preview) version today but this map square texture was only found in the OPM demo code, I checked the Preview's code but it wasn't there. You may also notice that the next quadrant over (D7) has grass extending out to the south which may suggest the lands extended further south in an earlier build of the game.

C7 island viewed from the shore at D7


Odd looking H4 map quadrant
Does this look like Avion's arena to you? Well, that's what it is! It appears to show a valley with two paths, one leading east, the other south. The east path would have led to I4 and from there you could have moved north to I3? The south path would have led to H5 then onto I5 which appears to have been a beach like area. But instead Team Ico changed the design and added Avion's enclosure on top of it (see below).

H4 map square with Avion's arena model added

Avion's arena today - note Avion to the far right (before activation)

F0 low res map square
Another interesting map square I found was this one at F0. It shows a green stretch of grass behind where the Entrance temple now stands but there is no evidence of the Entrance temple itself. The green lawn appears to end at a cliff wall that encloses desert sand. I believe the Entrance temple was added quite late in development as most of the early maps don't show the Entrance temple at all. But this green stretch of grass is still present in the opening cut scene.

Green field leading to the Entrance temple (montage)

F0 map square joins up with the G0 beach type cliffs
Above you can see clearly how the G0 beach matches well with the F0 quadrant. The G0 beach is only found in the pre-release (Preview) version but was removed in the final versions. This F0 map square was found in the PAL and NTSC games program code and appears to be an earlier version that shows a large sandy area 'behind' the Entrance temple. It may have once been possible to travel to the beach (possibly from #15's area) and ride around behind the northern cliff walls. I have speculated that the Spider colossus lived back here at either F0 or G0.

B2 beach joins with 14's mountains
When I overlay the world map onto the map I made with the unused (beta) lands, we can see how the B2 beach used to join up with the mountains surrounding #14's arena. Just as above the G0 beach was once part of a larger map. Today there are mountains blocking the way to the west, but in earlier builds it would have been possible to ride out west to the beach at B2 and possibly make your way south to B3? Perhaps the beach like sands extended further south? It's hard to say so I am just speculating here, but #14's hidden city seemed to have a more extensive amount of land around it at one time is seems. Update: 28th April 2015, the B2 beach like areas appears to have once been the lair of the Worm!

Wander at the junction of B2 and C2 (#14's area)

J7 map square - a lonely leftover
Then there is this map square, the only one I could find from the beta mountains, that is the lands that exist beyond the playable area in the game. Why this one map square was left in the code is a mystery, perhaps an oversight on Team Ico's part? But sadly I could find no other map squares from the I or J columns. To see more about the beta mountains see my blog post here:


F3 map quadrant from the final version
I also noticed a big difference at F3 (#2's lair) between the demos and the final version. You can see the demos feature a lot more rocks at the northern edge of the path you follow to access the beach. In the final version these rocks have been removed but otherwise they are virtually identical.

G5 map quadrant from the demos

G5 map quadrant from the final version
There's also a big difference in the G5 map squares (#4's lair). The demo matches the original map demo/pre-release map perfectly, but in the final versions they shifted the lair up to the northeast and changed the world map accordingly. Why they did this is unclear, the demo map trail heads south whereas the final version trail heads east. Sadly, when I tested this in the OPM demo (the earliest version we have) it still retains the later 'shifted' version of Phaedra's lair, even though the map shows the earlier configuration of the arena, the game itself is the same as the final versions. So the map lies! When you enter #'4's area in the demos, Wanders path veers off from the map and heads east instead of south.

Wander's path does not match the map
See my video 'More map mysteries' here: https://www.youtube.com/watch?v=KrPdw1tXDiA
OPM demo map
When you play the OPM demo (Official Playstation Magazine) the world map is covered in clouds and as you only get to fight the first colossus you never get to see what is beneath them. But using a code I turned off the clouds and discovered that half (8) of the colossi icons were positioned in the wrong place.
See video here: http://www.youtube.com/watch?v=Ne1uhw2sr28
But two save shrines are also missing from the map (which I meant to show in the video but forgot) so I will add it here. The two missing save shrines are 'Misty Falls' at G2 and 'The Lair on the Mesa' at B4. All the other save shrines are in the correct place.

Two missing save shrines in OPM demo
The next demo to appear was the PSU demo (Playstation Underground) and again the clouds obscure the game map, but using the same code I removed the clouds and this time found that 'the Lair on the Mesa' save shrine had been added but 'Misty Falls' was still missing, which shows us that it was the last save shrine to be added (along with the G2 forest).

PSU demo has only one missing save shrine (Misty Falls)
The next version to appear was the Preview version which shows all the save shrines added as well as the G2 forest (which was missing from the demo maps). So the G2 forest and Misty Falls save shrine appear to be the last elements added to the game before the full version was completed.
See video here: https://youtu.be/X1WY-wRQGLs?t=583
Update: 24-11-13See video here: https://youtu.be/X1WY-wRQGLs?t=583
In the latest edition of Edge magazine (issue #261), there is a new interview with Fumito Ueda by Daniel Robson. I was in contact with Daniel before the interview so I asked him to sneak in a few questions... Daniel allowed me to ask three questions which were:
1) Where were the arenas of the 8 discarded colossi located on the world map?
2) What was the purpose of the Dam like structure at I2 on the world map?
3) Was it once possible to climb to the very top of the Shrine of Worship?
But only one question ended up being answered in the article.
On the topic of Shadow of the Colossus, where on its map had you planned to place the eight colossi that were cut from the game?
The map in the game is designed to house 16 colossi. In other words, because the placement of those 16 colossi determined the shape of the map, it would be a completely different map if we'd included all 24. The intention was to choose the 16 best colossi and focus on making those ones even better. I think we were halfway through production when we decided to reduce their number. Oh, there's certainly leftover test data and half-edited areas, but it's a bit like the Minus World in Super Mario Bros: I think it holds more romantic appeal if you don't know the specifics.
So in other words, Ueda prefers not to say much about this topic and would rather leave it up to the players to decide what the world map once looked like 'it holds more romantic appeal if you don't know the specifics'. So we may never know where the 8 discarded colossi were originally planned to be, as those areas of the map don't exist in the game anymore, or if they do we can only speculate on where they are.
Daniel also asked Ueda about the Dam (off the record) that is it didn't appear in the article, he asked how he felt about fans being so passionate that they hack the game to find stuff like that, but he simply replied, 'That comes from an illegal source, so no comment'. In other words it's clear Ueda doesn't like the idea of players hacking into his beloved creation... this bodes badly for any future answers to these sort of questions.
Which really sucks! As we will never find out what the Dam's meaning was or where the beta colossi were placed or how they worked. Unless I can convince some other Team Ico member to answer questions we will never truly know these answers to these questions.